Emptied Recycle Bin or Shift+Delete
If little was written to that disk afterward, a normal scan may still find plenty. If nothing appears, Deep Scan is the next lever: expect more rows to review and longer run time.
Windows File Recovery Guide
Independent guide for scans, recovery habits, honest SSD limits, and practical fixes when the list stalls.
Jump in
Five short doors into the guide, UI walkthroughs, mechanics, longer articles, troubleshooting, and fast Q&A. Pick what matches where you are stuck.
Overview
Recuva is a free utility for Windows that scans hard drives, USB sticks, and memory cards for deleted files, shows what may still be recoverable, and helps you restore them with a wizard or an advanced view. Always save recovered data to a different disk than the one you scanned so you don’t overwrite what you are trying to rescue.
Plain-language Recuva on Windows, USB, SD, internal disks, and SSD limits, without claiming every file can be saved. Touch the source disk as lightly as you can, recover to another drive, and start with the lightest scan that still looks believable. Below: habits, scans, cases, and list colours, with links to Blog, Program, Fixes, and FAQ, we don’t sell software or services.
Windows-focused walkthroughs: USB, cards, and internal disks. We explain the UI; installer binaries are not stored on recuva.cc (managed download link on the Software section). Honest limits: SSDs, TRIM, and overwritten data get called out early.
We don’t host installer files on this domain. The Software section uses a managed rotating link; still verify names, sizes, and signatures before you run anything.
Cables, hubs, readers, and failing disks change outcomes. The Fixes page covers freezes, missing drives, and odd behaviour.
Quick scan suits recent deletes; Deep Scan is for messier cases and takes longer. The blog spells out when to switch.
Recovering back onto the same partition risks overwriting data. See Program for choosing a safe folder.
Modern SSDs can clear free space quickly. We set realistic expectations in the guide and in SSDs, TRIM, and realistic expectations.
Icons and screenshots live under ./images/. See the full set on Program.
Files under Users\…\Desktop and synced folders still live on a physical disk. What matters for recovery is which volume held the data, not the friendly folder name.
Real-time scanners and cloud sync can touch the same volume while you scan. If the list freezes or jumps, pause heavy background jobs and try again. Practical notes on Fixes.
Without a working key, encrypted volumes stay unreadable; recovery tools do not bypass that. Read what Recuva will not fix for plain-language limits.
Files that sat in the Bin still have a recent metadata trail on many NTFS volumes; Shift+Deleted items skip that cushion. Neither case guarantees success, especially on busy SSDs. Recycle Bin notes · FAQ.
Two identical-looking drives with the same capacity are easy to confuse. Use volume labels, serial hints in Disk Management, and “safely remove” discipline so the letter you scan matches the disk you mean.
“Missing” files are sometimes still under Downloads, a temp profile folder, or an app cache, not deleted at all. Skim those folders before you assume you need Deep Scan on the whole volume.
First aid
Quick habits before you run the app. Device context: How it works. Interface: Program.
No installs, no big copies onto the disk you’re scanning; every write can overwrite deleted data.
Start with a normal pass; switch to Deep Scan if names or folders are gone. Patience on large drives is normal.
Use a different physical drive or USB stick, not the same partition you’re rescuing from.
Open a few recovered files to confirm they’re good, then copy what matters somewhere safe.
From the guide
Longer explanations live on the Blog page; these point to the most useful pages first.
All blog notesFormatted drives, old deletes, missing filenames: when Quick Scan isn’t enough and how to sort noisy Deep Scan results.
Read moreWhy undelete gets harder on solid-state storage and what to do immediately if the data still matters.
Read moreCheap hubs and weak readers cause dropped scans. Save recovered files to the PC, not back onto the card.
Read moreWizard vs list view, where to point the scan, and how to pick a safe recovery folder before you recover anything.
Open ProgramMemory cards, USB quirks, SSD behaviour, and readers: the same software, different risks on each device class.
When it mattersEncryption, secure wipe, TRIM, and physical failure: situations where no scan replaces backups or a lab.
What it won’t fixOnline-only placeholders, provider recycle bins, and why “the folder is empty” is not always the same as “the disk is empty.”
Cloud sync notesLaptops dropping offline mid-pass, AC vs battery, and why finishing one Deep Scan beats restarting three times.
Power & sleepWhat actually happens when you empty the Bin, how NTFS metadata helps, or doesn’t, and why SSDs still break the story.
Recycle Bin articleWhy FAT32, exFAT, and NTFS change how “gone” a file looks before you ever open Recuva.
Filesystem hintsFolder picking, free space checks, and the habit that keeps one bad click from overwriting the only copy left.
Destination habitsWhen disk repair tools help, when they shuffle free space you still needed for recovery, and what to try first.
CHKDSK & repairScans
Both passes read the same hardware; they differ in how hard the program works the filesystem and how long you wait. Start with a normal scan, then escalate when the easy list is empty or untrustworthy.
Results
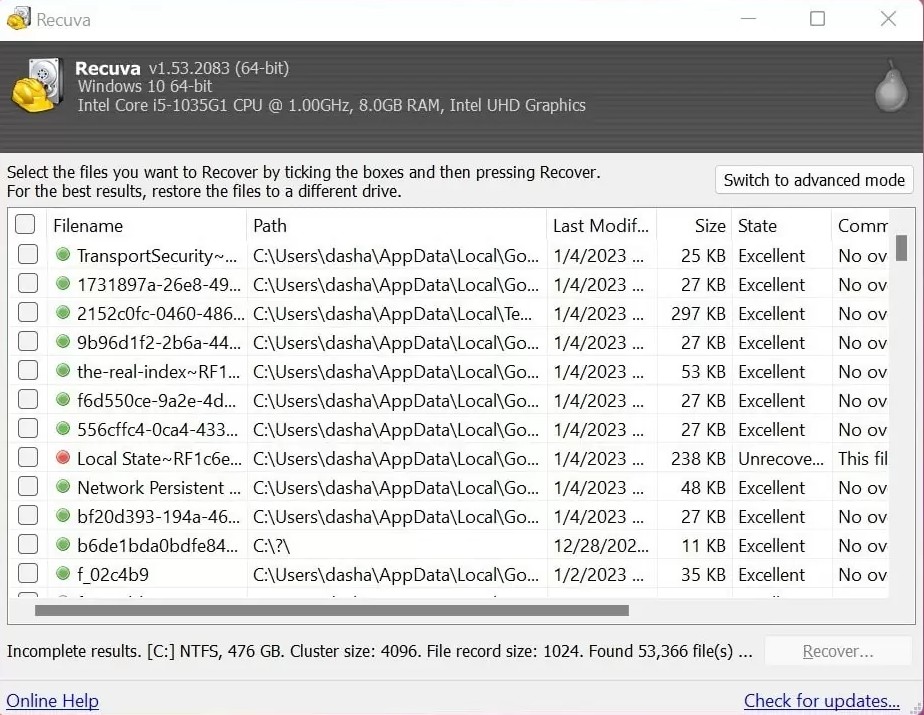
A long result grid is normal after Deep Scan, or after a busy disk with thousands of deleted entries. These habits keep you from recovering noise or missing the one folder you actually need. Screen-level detail: Program.
Use path fragments, modified date, and size to collapse the list mentally. Recovering thousands of junk rows fills the destination disk and wastes time on files you will delete again.
Thumbnails can look fine while the tail of a file is missing. When it matters, recover a sample to the safe disk and open it in the real application, not only in the preview pane.
Point recovery output at an empty folder on another drive with enough free space. Queue large batches only after a spot-check; if the tool or OS stalls, smaller chunks often finish more reliably.
If the first run felt wrong, confirm the drive letter, try the other scan mode, and read Fixes for drops and freezes before you loop endlessly.
Timing
Small choices in the first minutes matter more than tweaking every checkbox later. For hardware and OS context after you stabilise things, see How it works.
Close games, installers, and sync tools that might write to the volume. Don’t format, don’t “repair” the filesystem, and don’t save new files onto the same drive you’re trying to rescue.
USB letter swaps and “two drives with the same size” mistakes happen constantly. Unplug extras, use Disk Management if needed, and scan the disk you actually deleted from.
Choose a folder on a different physical disk before you start recovering: never back onto the source partition if you can avoid it.
Start with a normal scan; escalate to Deep Scan if the list is empty or names are garbage. When files come back, open a sample of photos and documents before you celebrate. See Fixes if previews lie.
Situations
The tool is the same; the context changes how you should act. These sketches point to the right pages; none of this replaces your own judgment or backups.
If little was written to that disk afterward, a normal scan may still find plenty. If nothing appears, Deep Scan is the next lever: expect more rows to review and longer run time.
Try a direct motherboard port, a short cable, and avoid flaky hubs. Large externals can scan for hours; that is not always a crash. If the disk vanishes from the list, check power and Disk Management before blaming the software.
Use a decent card reader, don’t let “repair” utilities write to the card before you recover, and save results to the PC drive first. Deep Scan is common when folders look empty.
TRIM and background activity can shrink your window. Act quickly, avoid installing recovery tools onto the same volume if you can, and keep expectations lower than on a spinning hard drive.
A fast format often clears directory trees but leaves recoverable data behind, until new writes land on the same clusters. Unplug the device from cameras or phones, don’t “fix” the card with random tools first, and scan with Deep Scan if the normal pass looks empty.
A mapped Z: share is not the same as local USB storage. Timeouts and permissions can make scans look frozen. OneDrive-style online-only files may never have existed fully on disk, check provider recycle or version history first.
Pitfalls
Panic is normal. These patterns show up often in questions and forums; avoiding them buys you time and disk headroom.
Saving “back where it was” can overwrite clusters you still need. Choose a folder on another physical disk every time, even when it feels slower.
C: during a C: crisisInstallers write temp files and logs. Prefer a portable run from USB when the loss is on the system drive. Program covers portable use.
CHKDSK, card repair tools, and camera “fix” apps can reshuffle or clear free space. Recover or image first when the files still matter.
Cancelling mid-pass can skip entries at the end of large volumes. On stable power, finishing one long run often beats restarting from zero.
Letters move when you plug devices in a different order. Confirm in File Explorer and Disk Management that the volume you scan is the one you actually deleted from, especially with several similar USB sticks.
Elevation can help when a volume is visible in Disk Management but missing from the app list, but only after you trust the binary. Don’t treat admin mode as a substitute for checking cables, locks, and reader quality first.
C:?On-screen language
Recuva labels recoverability in plain language. These are rules of thumb, not guarantees for every file type.
Usually a strong sign the clusters are still there. Still verify by opening samples after recovery, especially for documents and databases.
Partial overwrite or heavy fragmentation is more likely. Try recovering anyway to another disk; sometimes one copy opens when another does not.
The tool does not expect intact data at those locations. Double-check you scanned the right device before giving up.
Interface
Not every feature matters on day one. These are the pieces people actually click. Screens and diagrams live on the Program page.
Guided questions for file type and location, handy when you want defaults instead of a raw file tree.
Sortable results, path fragments, and recoverability hints so you can cherry-pick before recovering.
Normal pass first; Deep Scan when metadata is thin. Expect longer runs on big volumes.
Run from removable media when you must not install to C:, and optionally overwrite sensitive finds when you’re done.
If the scan hangs, the drive drops out, or recovered files won’t open, the Fixes page collects practical checks: cables, power, other USB ports, and realistic timing.
Prevention
Undelete tools are a safety net, not a backup strategy. A few boring habits matter more than any single scan setting.
Keep three copies of what you cannot lose, on two different media types, with one off-site or cloud copy. Start smaller if you must, even a monthly USB copy beats nothing.
Turn on File History or rely on provider version tools for cloud folders so “I saved over it” is not the same as “it is gone forever.”
Once a quarter, restore one random file from each backup path. A backup you have never opened is a guess, not a guarantee.
Next steps
Recovery is only half the job. A short routine reduces the chance you lose the same data twice or mistake a half-written file for a good one.
Open a random sample of photos at full size, play the start of a video, and open a document in the real app that created it. Thumbnails and file size alone can lie when clusters are only partly intact.
Deep Scan names are often generic. Copy everything you care about into a clear folder tree on the recovery drive, then rename in place, avoid writing back to the original volume until you are sure.
Cloud sync, an external drive, or a second internal disk breaks the single-point-of-failure habit. Schedule something automatic for next time so you are not back here in six months.
Recuva can offer secure overwrite for files you truly want gone. Use it deliberately on the copy you no longer need, not as a panic button on the whole disk. See Program for where that option lives.

Software
recuva.cc does not store installer files on this site. The button below uses a managed download link (a new random path each time you load the page) through our download gateway. Compare file names and sizes to what the publisher lists, scan if your workflow requires it, and prefer the official vendor when you can.
After install, run from a non-system drive when the loss is on C: if you can, see Program for portable layout.
“Recuva” is a trademark of its owner. This site is an independent guide only.